Introduction
If the teeth are lost despite all efforts to save them, a re-establishment should be made in such a manner as to function efficiently and comfortably in harmony with the stomatognathic system.
The lower denture commonly presents the most difficulties with pain and looseness being the most common complaint[1]. This is because the mandible atrophies at a greater rate than the maxilla and has less residual ridge for retention and support[2]. The neutral zone technique is most effective for patients who have had numerous unstable, unretentive mandibular complete dentures. These patients usually have a highly atrophic mandible and there has been difficulty in positioning the teeth to produce a stable denture.[3]
Neutral Zone is defined as the potential space between the lips and cheeks on one side and the tongue on the other; that area or position where the forces between the tongue and cheeks or lips are equal[4]. It is also known as dead zone[5], stable zone[6], zone of minimal conflict[7], zone of equilibrium[8], zone of least interference[9], biometric denture space[10], denture space[11], and potential denture space[12]. The neutral zone is that area in the mouth where, during function, the forces of the tongue pressing outward are neutralized by the forces of the cheeks and lips pressing inward.
As the surface area of the impression surface decreases due to bone resorption and the external surface area increases, the development and contour of the external surface becomes more critical.
Clinical And Laboratory Procedures
After a thorough examination of the patient, primary & final impressions of the patient are made followed by jaw relation & articulation in usual conventional manner.
Construction Of The Acrylic Base
After the articulation acrylic resin base is constructed on the mandibular cast on which an acrylic resin vertical stop is made to preserve vertical dimension at the time of neutral zone impression (Fig. 1).
 | Fig. 1: Acrylic Resin Base With Vertical Stop
 |
Manipulation Of Compound
To develop the body of the denture and to register the neutral zone by the use of modeling compound, there are three important factors to be considered. First the compound must be very securely attached to the tray. Secondly the compound must be thoroughly and uniformly softened for the muscles to mold the material. Third, it must be hard enough so that it will not flow and will maintain its shape as an occlusion rim until inserted into the mouth. Instead of impression compound, low fusing green stick wax or the mixture of two[13] can be used to record the neutral zone depending on operator’s choice to modify the properties.
A water bath, preheated to the adequate temperature, is used to soften the material. It is then kneaded and rolled into ‘U’ shaped and adapted on the temporary denture base. A Hanau torch can be used to heat and sear the compound so that it will completely adhere to the tray. The compound is tempered in the water bath. This keeps the compound soft so that it can be molded. Repeated flaming, tempering, and shaping, keeps the compound soft while it is shaped into the form of an occlusion rim.
Locating The Neutral Zone
To locate the neutral zone for the lower arch, the patient's lips are lubricated with petroleum jelly. Maxillary bite rim is first seated in the mouth followed by the mandibular tray with the softened modeling compound is carefully seated. Care must be used so that the lips do not press against the compound until it is completely seated. The patient is instructed to swallow and then purse the lips as in sucking. Patient is asked to perform physiologic movements as in phonetics and swallowing (Fig. 2).
 | Fig. 2: Recording Of Neutral Zone Impression
|
It is important to instruct the patient to keep the lips together and swallow. We should not tell the patient to close and swallow. By doing so, the patient may overclose and press the compound into the maxillary ridge, distorting the compound. Proper swallowing actions will mold the compound rim into the neutral zone. Sufficient time is allowed for the compound to harden and it is then removed from the mouth and inspected.
If initially an excessive amount of compound is used, it will be forced upward above the normal height of the occlusal plane and because of excessive bulk of compound, the tongue, lips and cheeks will be unable to mold the compound into a neutral zone of proper width. Therefore, any excess compound above the usual height of the occlusal plane is removed with a sharp knife and the compound is resoftened, placed back in the mouth and the patient is instructed to suck and swallow.
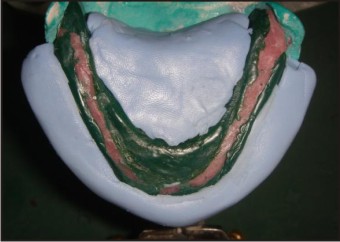
In all cases, the compound will exhibit similar shapes and contours, but there will be definite differences for each patient. The lingual surface of the compound rim will be shaped to the contour necessary to avoid interference with functional tongue movements. The anterior segment of the compound rim may have a labial, straight or lingual inclination depending on the tonus of the muscles in the lower lip and also the action of the tongue during swallowing. The buccal surface will generally be inclined to the lingual with a narrowing in the bicuspid area where the modiolus functions. The lingual surface will be inclined to the buccal.(Fig. 3)
 | Fig. 3: Recorded Neutral Zone Impression
|
Testing The Stability
The impression is placed back into the patient’s mouth and checked for stability by having the patient open wide, wet the lips with the tongue, count from 1 to 100, and say exaggerated "oh" "ahs" and "ees". If these movements raise the rim, the lack of stability must be caused by an improper molding of the compound, as the tray or base was proved to be stable. In such cases, the compound is resoftened and the procedure is repeated until a stable rim is achieved.
The next procedure is to test the outer edge of the impresson with the tip of the index finger in the bicuspid and incisor regions. If pressure on the outer edges causes the opposite side to lift up, then the impression must be narrowed from the labial or buccal to where the vertical pressure will not cause the base to tilt. This will occur where there has been extensive ridge resorption and where the residual ridge is narrow bucco-lingually and labio-lingually. After the labial contour and curvature of the impression have been established and if the width of the anterior section is thicker than the incisal edges of the anterior teeth, the impression should be narrowed by trimming from the lingual.
The final test is to have the patient speak, swallow, wet the lips and open wide without the impression moving or being dislodged. We have therefore created a tray or base that is not dislodged by muscle function and have placed on it a body that is also not displaced by muscle function.
Fabrication Of Tongue, Lip And Cheek Matrices
With the lower neutral zone impression in place, the lower model is lubricated and rubber base putty material is placed on the lingual portion of the model, forming an artificial tongue, and on the labial and buccal of the lower model, completely encasing the impression. These matrices are trimmed to the exact height of the lower occlusal plane, which was established in the mouth. This preserves the height of the lower occlusal plane. (Fig. 4)
 | Fig. 4: Fabrication Of Putty Index
|
After the putty is set, when neutral zone impression is removed, the matrices can be placed back into position. (Fig. 5) The space between the matrices on the lower rim represents the neutral zone and indicates where the teeth should be positioned. In this space a wax occlusal rim is fabricated for arrangement of teeth. (Fig. 6)
 | Fig. 5: Putty Index On The Model
|
 | Fig. 6: Fabrication Of Occlusal Rim
|
After selection of the proper size, occlusal morphology and material of the teeth to be used, we go in for the arrangement of teeth with in the matrix formed by putty.
The Trial Denture
After the verification and correction of the stability, retention, vertical dimension, phonetics, centric relation and esthetics is done. There is an important step to be completed during the trial denture try in is the making of external impressions on the labial, buccal and lingual surfaces of the dentures. These will determine the thickness, contours and shape of the polished surfaces of the denture. By means of external impressions, a physiologic molding is made so that the external surfaces are functionally compatible with muscle action.
The trial denture acts as a tray to be used for the accurate secondary impression for forming the contours of the external surface of the denture. The trial dentures are waxed up so that there is just enough wax to hold the tooth, in position. The materials for the external impressions are either zinc oxide eugenol, one of the conditioning materials or light body addition silicone impression material.
The impression material is placed on the lingual surfaces of the lower denture, between the necks of the teeth and the denture periphery. The upper trial denture is placed in position, and the lower is then rotated into the mouth, taking care not to wipe off any material on the lips. With the lower trial denture in position, the patient is asked to close, purse the lips as in sucking and swallow. This is repeated several times. After the material has set, the trial dentures are removed from the mouth, and the gross excess is cut away. The impression material is then placed on the buccal and labial surfaces of the lower trial denture, and sucking and swallowing motions are repeated (Fig.7).
By duplicating these impressions in the final denture, the operator has reproduced functionally contoured external surfaces of the denture that will aid immeasurably in the retention and stability of the dentures.
 | Fig. 7: Light Body Secondary Impression Of Polished Surface
|
Processing Of The Dentures
The laboratory procedures for investing, packing and processing of the dentures using the neutral zone technique are generally the same as for conventional dentures. However, because of the materials used for the external impressions, it is necessary to be especially careful in some of the procedures.
When zinc oxide eugenol paste has been used for taking the impression of the polished surface, the flasks should not be allowed to remain in the boil out tank for not more than 5 minutes. Reason being the zinc oxide eugenol paste gets liquefied if left for a longer time. This results in bleached appearance of the processed denture.
After the dentures are being processed, they are mounted on the articulator. Occlusal discrepancies are checked and corrected. The dentures are finished, polished and ready for insertion. (Fig. 8)
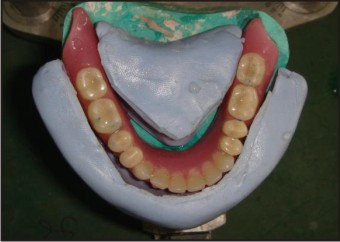 | Fig. 8: Processed Denture
|
Conclusion
The neutral zone philosophy is based on the concept that for each individual patient there exists within, the denture space, a specific area where the function of the musculature will not unseat the denture, and at the same time where the forces generated by the tongue are neutralized by the forces generated by the lips arid cheeks.
The neutral zone has not been given enough importance, in the literature, but complete and partial denture failures are often related to non compliance with neutral zone factors. Fahmy et al[14] has also found in his study that the comfort & speech performance is better in the patients having dentures made with neutral zone technique.
Regardless of the method of treatment, any part of the dentition out of harmony with the neutral zone will result in instability, interference with function, or some degree of discomfort to the patient. Thus the neutral zone must be considered as an important factor while rehabilitating the edentulous patients. The operator should try to neutralize forces acting on complete dentures, which will make the prostheses more functionally physiologically and psychologically acceptable to the patient.
References
1. Basker RM, Harrison A, Ralph JP. A survey of patients referred to restorative dentistry clinics. Br Dent J 1988; 164:105–108.
2. Atwood DA. Post extraction changes in the adult mandible as illustrated by micrographs of midsagitall sections and serial cephalometric roentgenograms. J Prosthet Dent 1963; 13:810–824.
3. Gahan MJ, Walmsley AD. The neutral zone impression revisited. Br Dent J 2005; 198:269-272.
4. Glossary of Prosthodontic Terms 8th ed. J Prosthet Dent 2005; 94:10-92.
5. Fish EW. Using the muscles to stabilize the full lower denture. J Am Dent Assoc1933; 20:2163-9.
6. Brill N, Tryde G, Cantor R. The dynamic nature of the lower denture space. J Prosthet Dent 1965; 15:401-18.
7. Brill N, Tryde G, Cantor R. The dynamic nature of the lower denture space. J Prosthet Dent 1965; 15:401-18.
8. Grant AA, Johnson W. An introduction to removable denture prosthetics. Edinburgh: Churchill Livingstone; 1983. p. 24-8.
9. Wright SM. The polished surface contour: a new approach. Int J Prosthodont 1991; 4:159-63.
10. Watt DM, MacGregor AR. Designing complete dentures. 2nd ed. Bristol: IOP Publishing Ltd; 1986. p. 1-31.
11. Schlosser RO. Complete denture prosthesis.Philadelphia: WB Saunders; 1939. p. 183-90.
12. Roberts AL. The effects of outline and form upon denture stability and retention. Dent Clin North Am 1960; 4:293-303.
13. Cagna DR, Masad JJ, Schiesser FJ. The neutral zone revisited: From historical concepts to modern application. J Prosthet Dent 2009; 101:405-412.
14. Fahmy FM, Kharat DU. A study of the importance of the neutral zone in complete dentures. J Prosthet Dent 1990; 64:459-462.
|